# Zookeeper分布式hadoop集群部署
# 1)下载安装包
- 下载Zookeeper安装包
- 上传zookeeper安装包到linux指定的目录下
# 2)配置环境变量
配置环境变量
打开文件
vi /etc/profile
1
配置zookeeper环境变量
export ZK_HOME=/opt/zookeeper-3.4.14
export PATH=$PATH:$ZK_HOME/bin
1
2
2
刷新配置文件
source /etc/profile
1
# 3)解压Zookeeper安装包
tar -zxvf zookeeper-3.4.14.tar.gz
1
# 4)Zookeeper相关配置
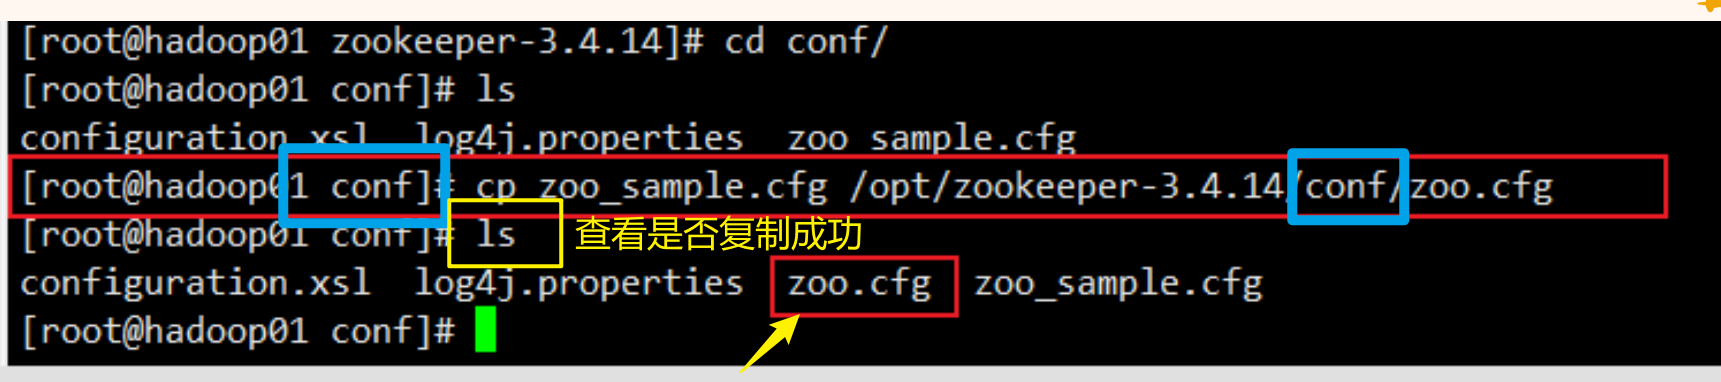
# 第一步:
cd进入zookeeper目录下的conf目录里,将zoo_sample.cfg复制一份,并且重命名为zoo.cfg

cp zoo_sample.cfg /opt/zookeeper-3.4.14/conf/zoo.cfg
1
# 第二步:
修改配置文件zoo.cfg,分别设置dataDir目录,配置服务器编号与主机名映射关系,设置与主机连接的心跳端口和选举端口。
心跳端口
选举端口
# The number of milliseconds of each tick
# 设置通信心跳数
tickTime=2000
# The number of ticks that the initial
# synchronization phase can take
initLimit=10
# The number of ticks that can pass between
# sending a request and getting an acknowledgement
syncLimit=5
# the directory where the snapshot is stored.
# do not use /tmp for storage, /tmp here is just
# example sakes.

# 设置数据文件目录+数据持久化路径
#dataDir=/tmp/zookeeper
dataDir=/export/data/zookeeper/zkdata

# the port at which the clients will connect
# 设置客户端连接的端口号
clientPort=2181
# the maximum number of client connections.
# increase this if you need to handle more clients
#maxClientCnxns=60
#
# Be sure to read the maintenance section of the
# administrator guide before turning on autopurge.
#
# http://zookeeper.apache.org/doc/current/zookeeperAdmin.html#sc_maintenance
#
# The number of snapshots to retain in dataDir
#autopurge.snapRetainCount=3
# Purge task interval in hours
# Set to "0" to disable auto purge feature
#autopurge.purgeInterval=1

# 配置Zookeeper集群的服务器编号以及对应的主机名、通信端口号(心跳端口号)和# # 选举端口号。
server.1=hadoop01.2888.3888
server.2=hadoop02.2888.3888
server.3=hadoop03.2888.3888
1
2
3
4
5
6
7
8
9
10
11
12
13
14
15
16
17
18
19
20
21
22
23
24
25
26
27
28
29
30
31
32
33
34
35
36
37
38
39
2
3
4
5
6
7
8
9
10
11
12
13
14
15
16
17
18
19
20
21
22
23
24
25
26
27
28
29
30
31
32
33
34
35
36
37
38
39
注意知识概念清楚
server.1=hadoop01.2888.3888
1:表示服务器编号
hadoop01:表示服务器地址
2888:表示通信端口号=心跳端口号
3888:表示Leader选举端口号
# 第三步:
创建myid文件
3.1:根据配置文件zoo.cfg中设置的dataDir目录,创建zkdata文件夹
mkdir -p /export/data/zookeeper/zkdata
1
3.2:创建文件
zkdata目录下创建myid文件
touch myid
1
写入服务器对应的编号
Hadoop01 =》 1
hadoop02 =》2
......
# 5)分发Zookeeper相关配置文件到其他服务器
# 第一步:
将zookeeper-3.4.14这个目录发送同步到hadoop这台机子上的opt目录下
scp -r /opt/zookeeper-3.4.14/ hadoop02:/opt
1
# 第二步:
其次:将myid文件分发到hadoop02,或其他主机上,依次改为主机对应的编号
scp -r /export/ hadoop02:/
1
# 第三步:
分发环境变量文件
scp -r /etc/profile hadoop02:/etc/profile
1
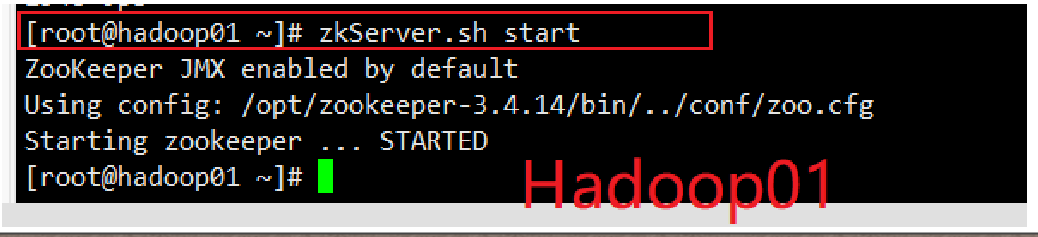
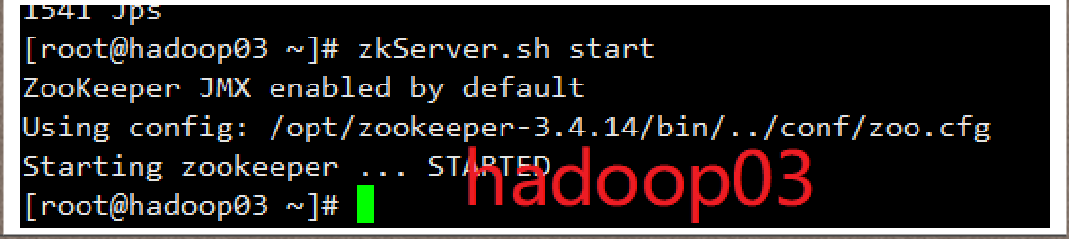
# 6)Zookeeper服务的启动
zkServer.sh start
1
注意启动顺序 1-2-3

# 查看状态
zkServer.sh status
1
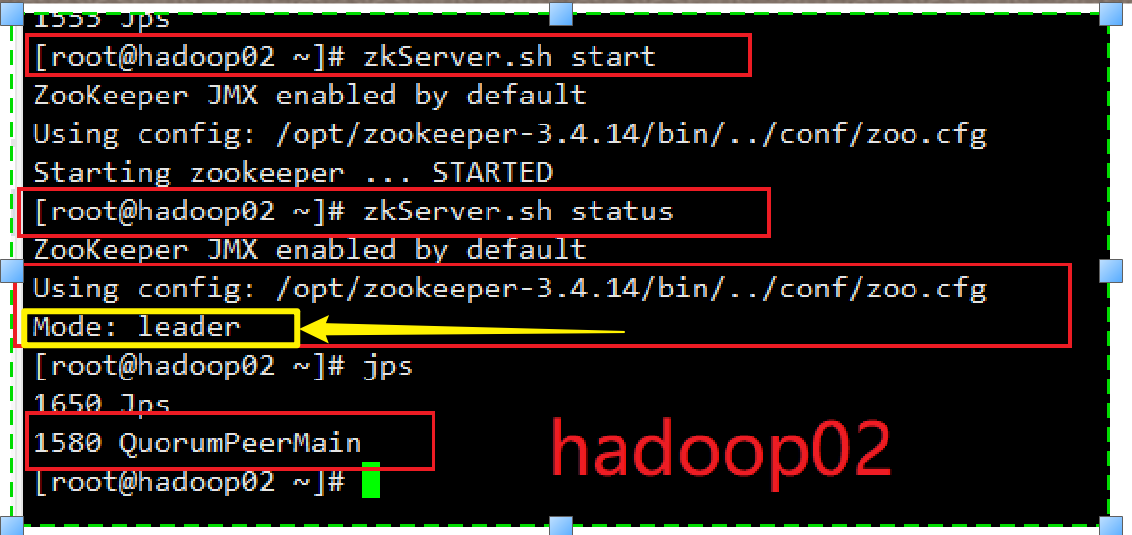
hadoop02为Leader
所以:zookeeper的Leaders+Follower部署成功
# 7)关闭zookeeper服务
zkServer.sh stop
1