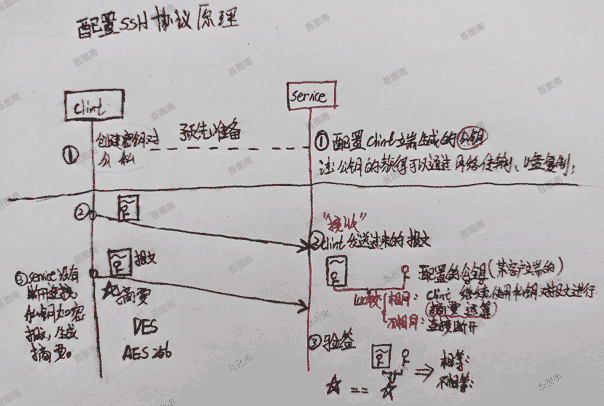
# 配置ssh协议
ssh配置原理图如下:
# 配置SSH步骤
实验拓补图:

需求描述:
R1为ssh的服务端。ip为202.100.1.1。
R2为ssh的客户端。ip为202.100.1.2。
结果:R2可以ssh连接到R1.R2通过输入密码连接登入到R1的设备上进行远程操作。
实验实现步骤:
启动R1与R2。
登入R1进行端口IP地址绑定配置:

第一步:进入系统视图:

system-view
1
第二步:修改设备的名字:
sysname HW-R1
1

第三步:配置ip地址:
进入端口配置:
interface GigabitEthernet0/0/0
1
配置IP地址:

ip address 202.100.1.1 255.255.255.252
1
第四步:登入R2进行初始化配置:
# 第一步:进入系统视图
<Huawei>system-view
Enter system view, return user view with Ctrl+Z.

# 修改设备的名字
[Huawei]sysname HW-R2

# 端口号
[HW-R2]interface GigabitEthernet0/0/0

# 给端口号分配地址:
[HW-R2-GigabitEthernet0/0/0]ip address 202.100.1.2 255.255.255.252

Feb 16 2025 18:36:18-08:00 HW-R2 %%01IFNET/4/LINK_STATE(l)[0]:The line protocol
IP on the interface GigabitEthernet0/0/0 has entered the UP state.
# 配置完毕
[HW-R2-GigabitEthernet0/0/0]
1
2
3
4
5
6
7
8
9
10
11
12
13
14
15
16
17
2
3
4
5
6
7
8
9
10
11
12
13
14
15
16
17
第五步:实验二台设备是否能ping通。
R1 ping R2
ping 202.100.1.2
1
实验结果:
<HW-R1>ping 202.100.1.2
  PING 202.100.1.2: 56  data bytes, press CTRL_C to break
    Reply from 202.100.1.2: bytes=56 Sequence=1 ttl=255 time=170 ms
    Reply from 202.100.1.2: bytes=56 Sequence=2 ttl=255 time=30 ms
    Reply from 202.100.1.2: bytes=56 Sequence=3 ttl=255 time=10 ms
    Reply from 202.100.1.2: bytes=56 Sequence=4 ttl=255 time=30 ms
    Reply from 202.100.1.2: bytes=56 Sequence=5 ttl=255 time=30 ms

  --- 202.100.1.2 ping statistics ---
    5 packet(s) transmitted
    5 packet(s) received
    0.00% packet loss
    round-trip min/avg/max = 10/54/170 ms
1
2
3
4
5
6
7
8
9
10
11
12
13
2
3
4
5
6
7
8
9
10
11
12
13
说明配置是没有问题的。
第六步:登入R1设备进入aaa模式。
aaa表示:认证、授权、审计。这个模式用来创建用户与密码。
Enter system view, return user view with Ctrl+Z.
[HW-R1]aaa
[HW-R1-aaa]
1
2
3
2
3
执行下面命令创建用户与密码:
username:用户名。password:用户密码。cipher:表示密码以加密方式存储。
local-user admin password cipher Admin@123
1
设置用户的级别为最高:
local-user admin privilege level 15
1
设置该用户用于SSH登入:
local-user admin service-type ssh
1
设置SSH用户admin通过密码进行认证:
ssh user admin authentication-type password
1
执行结果:
[HW-R1-aaa]ssh user admin authentication-type password
 Authentication type setted, and will be in effect next time
1
2
2
注意:一定要开启ssh服务。
stelnet server enable
1
第七步:登入R1设备上创建RSA的Key。
rsa local-key-pair create
1
R1设备的执行结果:
[HW-R1]rsa local-key-pair create
The key name will be: Host
% RSA keys defined for Host already exist.
Confirm to replace them? (y/n)[n]:y
The range of public key size is (512 ~ 2048).
NOTES: If the key modulus is greater than 512,
       It will take a few minutes.
Input the bits in the modulus[default = 512]:768
Generating keys...
........++++++++
..++++++++
....+++++++++
.+++++++++
1
2
3
4
5
6
7
8
9
10
11
12
13
2
3
4
5
6
7
8
9
10
11
12
13
第八步:登入R1设备上进入VTY通道进行配置:
VTY通道是什么?
VTY通道是用来干嘛的呢?
进入vty
user-interface vty 0 4
1
在vty通道中选择aaa模式
authentication-mode aaa
1
protocol inbound ?
1
vty允许ssh登录
protocol inbound ssh
1
上面命令在R1设备上的执行结果如下:
[HW-R1]user-interface vty 0 4
[HW-R1-ui-vty0-4]authentication-mode aaa
[HW-R1-ui-vty0-4]protocol inbound ?
  all     All protocols
  ssh     SSH protocol
  telnet  Telnet protocol
[HW-R1-ui-vty0-4]protocol inbound ssh
[HW-R1-ui-vty0-4]
1
2
3
4
5
6
7
8
2
3
4
5
6
7
8
第九步:测试SSH登入。
登入R2的设备上。
注意:要在系统视图进行测试。
stelnet 202.100.1.1
1
执行结果:
[HW-R2]stelnet 202.100.1.1
Please input the username:admin
Trying 202.100.1.1 ...
Press CTRL+K to abort
Connected to 202.100.1.1 ...
Error: Failed to verify the server's public key.
Please run the command "ssh client first-time enable"to enable the first-time ac
cess function and try again.
1
2
3
4
5
6
7
8
2
3
4
5
6
7
8
在R2的设备上
ssh client first-time enable
1
ssh登入远程R1设备成功的结果:
[HW-R2]stelnet 202.100.1.1
Please input the username:admin
Trying 202.100.1.1 ...
Press CTRL+K to abort
Connected to 202.100.1.1 ...
The server is not authenticated. Continue to access it? (y/n)[n]:y
Feb 16 2025 19:26:43-08:00 HW-R2 %%01SSH/4/CONTINUE_KEYEXCHANGE(l)[0]:The server
 had not been authenticated in the process of exchanging keys. When deciding whe
ther to continue, the user chose Y.
[HW-R2]
Save the server's public key? (y/n)[n]:y
The server's public key will be saved with the name 202.100.1.1. Please wait...

Feb 16 2025 19:26:50-08:00 HW-R2 %%01SSH/4/SAVE_PUBLICKEY(l)[1]:When deciding wh
ether to save the server's public key 202.100.1.1, the user chose Y.
[HW-R2]
Enter password:
Enter password:
<HW-R1>
1
2
3
4
5
6
7
8
9
10
11
12
13
14
15
16
17
18
19
2
3
4
5
6
7
8
9
10
11
12
13
14
15
16
17
18
19
注意事项
- 安全性:
- 启用
ssh client first-time enable后,客户端会自动信任目标服务器的公钥。 - 如果目标服务器的公钥被篡改(例如中间人攻击),客户端可能无法检测到。
- 因此,建议在首次连接成功后,禁用该功能以增强安全性:
- 启用
- 服务端公钥变化:
- 如果目标服务器的公钥发生变化(例如服务器重装),客户端会提示公钥不匹配。
- 此时需要手动更新公钥或重新启用首次访问功能。
总结
ssh client first-time enable是 客户端 的配置,用于跳过首次连接时的公钥验证。- 它适用于第一次连接目标服务器的场景。
- 为了安全性,建议在首次连接成功后禁用该功能。
# 保存配置
在用户试用执行下面的命令:
save
1

# 查看保存的配置
配置完毕后。我们执行了save命令进行配置的保存。下面是查看这个设备的配置了哪些信息。
display saved-configuration
1
执行查看配置信息的结果:
<HW-R1>display saved-configuration
[V200R003C00]
#
 sysname HW-R1
#
 snmp-agent local-engineid 800007DB03000000000000
 snmp-agent
#
 clock timezone China-Standard-Time minus 08:00:00
#
portal local-server load portalpage.zip
#
 drop illegal-mac alarm
#
 set cpu-usage threshold 80 restore 75
#
aaa
 authentication-scheme default
 authorization-scheme default
 accounting-scheme default
 domain default
 domain default_admin
 local-user admin password cipher %$%$K8m.Nt84DZ}e#<0`8bmE3Uw}%$%$
 local-user admin service-type http
#
firewall zone Local
 priority 15
#
interface GigabitEthernet0/0/0
 ip address 202.100.1.1 255.255.255.252
#
interface GigabitEthernet0/0/1
#
interface GigabitEthernet0/0/2
#
interface NULL0
#
user-interface con 0
 authentication-mode password
user-interface vty 0 4
user-interface vty 16 20
#
wlan ac
#
return
1
2
3
4
5
6
7
8
9
10
11
12
13
14
15
16
17
18
19
20
21
22
23
24
25
26
27
28
29
30
31
32
33
34
35
36
37
38
39
40
41
42
43
44
45
2
3
4
5
6
7
8
9
10
11
12
13
14
15
16
17
18
19
20
21
22
23
24
25
26
27
28
29
30
31
32
33
34
35
36
37
38
39
40
41
42
43
44
45